Microsoft released its major Operating System Windows 11 after 6 years, Windows 11 is rolled out on October 5, 2021. Microsoft announced that Windows 11 is free to Upgrade for existing Windows users. But to upgrade to Windows 11, the system has to meet the minimum system requirements. This rules out millions of existing Windows 10 devices from upgrading to Windows 11 with full support. The minimum system requirements include TPM, Secure Boot, and Processor.

Most of the systems got ruled out due to the Processor requirements. Because Microsoft has altered its minimum hardware requirements, and the most surprising thing is the CPU changes. Microsoft announces that Windows 11 will officially support 8th Gen and newer Intel core processors, alongside Apollo Lake and newer Pentium and Celeron Processors. And recently Microsoft announce that even though your system doesn't meet the minimum system requirements, still you can install windows 11. So, using Rufus you can easily create Windows 11 bootable USB which will skip the Minimum system requirements check while installing Windows 11.

This article will guide you to create Windows 11 bootable USB for unsupported device using Rufus. This post shows students and new users steps to create a Windows 11 ISO file for unsupported hardware. The official Windows 11 will not installed on PCs that do not meet its straight requirements.

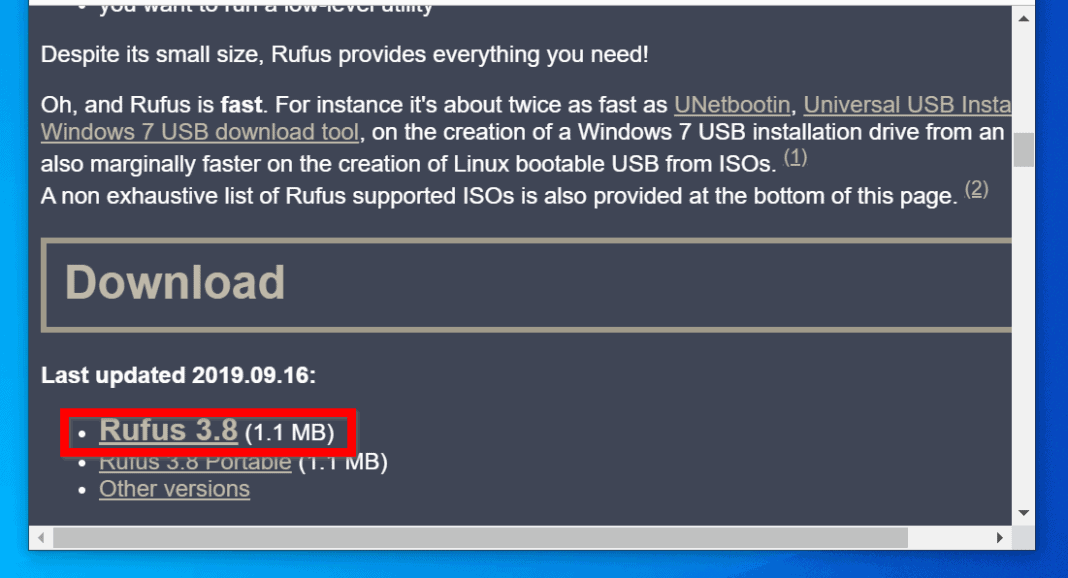
If you want to install Windows 11 on a computer with unsupported hardware, there is now one more tool to make that process easier. Rufus, a neat third-party utility to create bootable USB drives in Windows, received an update to version 3.16 Beta 2. The main highlight of the update is the ability to make a Windows 11 installation media without Microsoft's security requirements.

Perhaps installing Windows 11 on a new computer or device with an empty hard drive is the only option. After deleting the appraiserres.dll from Windows 11 ISO, you can install Windows 11 on unsupported hardware. Now, the popular bootable USB drive creator tool, Rufus, officially supports bypassing TPM, Secure Boot, and RAM checks while making a bootable USB flash drive of Windows 11.

That means you don't have to manually delete the appraiserres.dll file to bypass the minimum hardware requirements to install Windows 11 on an unsupported hardware device. The software is still in the beta stage, so that you may find a bug in this tool. Compared with Rufus, the upcoming method can be a perfect one.

EaseUS Win11Builder completely solved the problem for all inexperienced Windows users who are unable to find and download an official Windows 11 ISO file. Rufus is a most well-known third party media creation tool that helps users create bootable USB drives. With version 3.16 beta 2,it has an "extended mode", which allows you to bypass Microsoft's primary security requirements and RAM limits. As well as make raw installation media to install Windows 11 for almost any new or old system.

The ones mentioned do not bog the system performs in a fast manner. Moreover alternates mentioned can work on all major OS including macOS, Windows, Ubuntu as well as Linux. Offline ISO file and want to create a bootable USB drive for clean or fresh installation in your computer system, this article will help you.

This is the easiest and quickest way to make Windows 11 bootable USB along with disabling all installation requirements check. Rufus is a third party media creation tool, commonly used to create bootable USB drives. Version 3.16 Beta 2 includes an "extended mode" which users can use to bypass Microsoft's main security requirements and RAM requirements. The process of creating a bootable USB for any Windows operating system is the same as it was for Windows 10 windows and Windows Server or any other type of windows. The thing is that Microsoft's TPM 2.0 requirement and secure boot, alongside generation 8, is really causing users to install Windows 11 on unsupported PC.

There is a small trick that you can use it to bypass the processor, TPM, and secure board issues to install windows 11 on Unsupported PC. Let's begin without wasting time. After you complete the steps, the free utility will download the ISO file and create the bootable media to install Windows 11 that meet the minimum requirements. If you selected the "Extended" option, the setup will bypass the requirements, and it'll let you continue with the installation . Microsoft has officially released Windows 11 with the TPM 2.0 and secure boot requirements. Based on what Microsoft has said, computers from 2016 later can support windows 11, older PCs cannot support windows 11.

If you are one of those guys who want to install windows 11 on an unsupported PC, the first step is to create bootable USB for unsupported PC to install windows 11. Microsoft initially restricted Windows 11 to the PCs with TPM 2.0, supported CPU and Secure Boot. However, company now allows you to upgrade to Windows 11 with unsupported CPU and TPM 1.2. But Secure Boot restriction is still there.
So, to bypass these limitations, you can use Rufus to create bootable Windows 11 USB and clean install Windows 11 on both supported and unsupported hardware/PCs. Rufus is a free tool that you can use to easily create a bootable USB flash drive to upgrade or clean install Windows 11. The tool works similar to the Media Creation Tool, and you can provide an existing ISO file or there's an option to download the files directly from the Microsoft servers. To follow these steps, you may use either Windows 10 or Windows 11. So that is how you can create a bootable Windows 11 USB stick and install the brand new desktop OS from Microsoft on your computer. The process is pretty similar to how we install Windows 10 from a USB thumb drive.
Even if you are new to Windows installation, you can follow the guide step by step and get Windows 11 running in no time. In case you want to disable the newly-launched Widgets feature or disable the Microsoft Teams Chat icon in the taskbar on Windows 11, follow our linked tutorial. And if you want to check out a complete list of Windows 11 keyboard shortcuts, we have you covered. Finally, if you have any questions, comment down below and let us know.

Microsoft has made it easier for you to experience Windows 11 through the Windows Insider Program. You can easily upgrade to Windows 11 from Windows 10 through the Dev channel without having to set up everything manually. In fact, Windows Insider Beta users can now also receive Windows 11 updates seamlessly. But having said that, if you are someone who likes to clean install Windows, then flashing Windows 11 from USB would be a good option.

That means you will have no temporary or leftover files, resulting in a faster and smoother experience. So if you want to install Windows 11 from USB, follow the step-by-step guide below. Once the process has been completed.

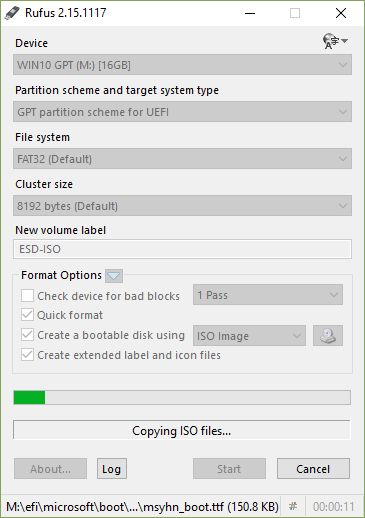
You need to close all the messages and then click the close button. You have created a bootable Windows 11 USB flash drive for unsupported hardware using the Extended Windows 11 (TPM 2.0, Secure Boot, 8GB + RAM) option. Once you have your USB drive plugged into your PC, open Rufus and it should automatically detect the new drive.

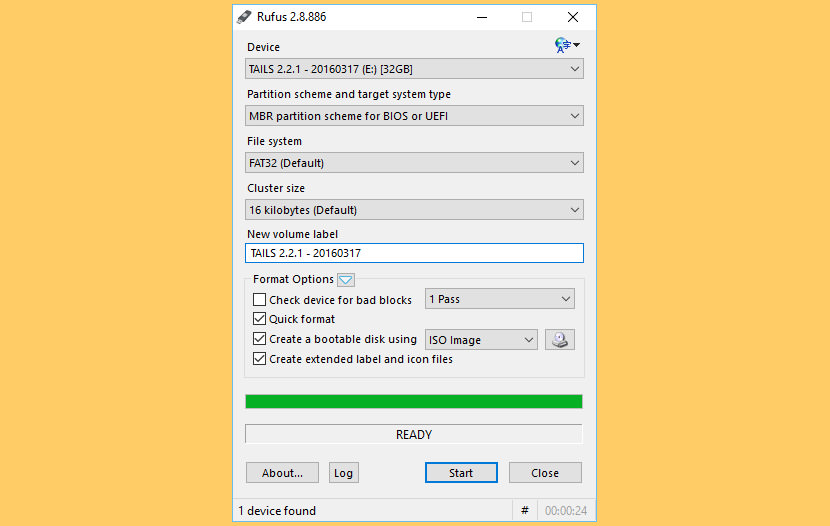
Select the Windows 11 ISO from the boot sector menu, then in the image options menu, select the extended installation for Windows 11. Finally, you can click start, and Rufus will create a bootable Windows 11 installation drive that is free of Microsoft's RAM, Secure Boot, and TPM requirements. On Windows 11, you have at least two tools to download the installation files onto a USB flash drive and make it bootable. You can use the official Media Creation Tool to download the files onto a removable storage. Or you can use Rufus, a third-party tool that makes it easy to create a flash drive to install the OS on a compatible or incompatible devices.

Before advancing with the steps to create the installation media, it is advised that you properly back up your PC. Once you do the backup, below are the steps to create bootable Windows 11 USB media. Instead, virtual machine software can boot the installation files from the ISO directly without the need for a bootable flash drive. The Windows11 installation process has become increasingly more complicated.

With the release of Microsoft's latest operating system, it is even more challenging to install. Several new security features make it harder for users to bypass the activation process and make unauthorized changes to their PC. The following methods need a Windows 11 ISO file to work. The utility provides two methods to create the installation media, including using an existing ISO file or directly downloading the file from the Microsoft servers. Also, starting with version 3.16 and higher there's an "Extended" option to create a bootable USB that bypasses the security and memory requirements.

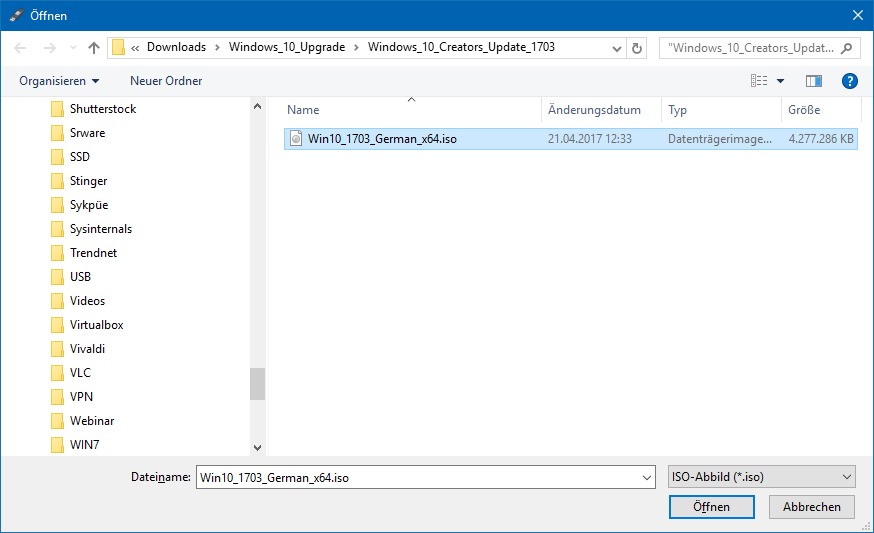
Rufus lets you download the ISO file and create a bootable USB flash drive to install Windows 11 on supported and unsupported hardware. To begin with, start the program. The first step is to choose the system image file you need and click "Select." The second step is to select the media type, in our case it's the USB device.

If you don't have any important files on this drive, click "Start". In the previous post, we discussed how to create a Windows bootable drive with Rufus, a free and open-source application for installing Microsoft Windows. It's like to image a bootable ISO file to an external USB device, but the premise is that you've downloaded the ISO file by yourself. The tool will create bootable media with Windows 11 installation media once you've completed the procedures. Rufus is popular software used to create USB bootable drives on Windows that are able to support different formats of images including Linux distros and Windows ISO files.
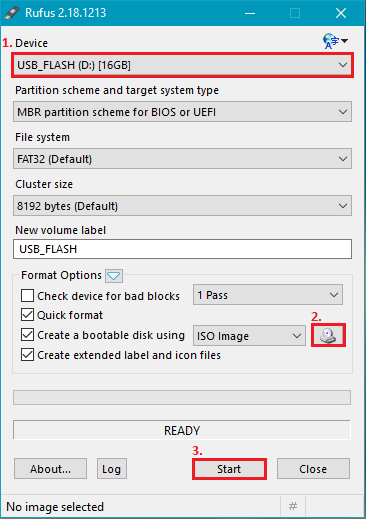
We have researched the 9 best Rufus alternatives that you can use for Windows 11. Method 2,You can boot your computer to do a clean installation of Windows 11 without the restrictions, OR you can install windows 11 on unsupported hardware. Then, at the top, make sure toselect the USB drivethat you want to use to create the bootable media for windows 11 for unsupported hardware. So here's how to use Rufus extended Windows 11 feature to create a bootable Windows 11 USB flash drive to install the os on unsupported hardware. So, in this tutorial, we will describe the method to create bootable Windows 11 USB disk for both supported and unsupported hardware.

Besides that, you can also create Windows 11 USB for Legacy BIOS. This allows you to install Windows 11 on a PC without UEFI. However, Microsoft may restrict Windows updates on unsupported PCs in future. So, it's your call to go for it or stay with Windows 10. After downloading the ISO file, you might want to create bootable USB drive to clean install Windows 11 in your computer system or other devices. Alternatively, you can try and use the USB drive as a bootable installation drive.
However, this is where things get even more complicated, due to Windows 11 requiring Secure Boot, and the USB drive we just created not being compatible with that feature. Once you complete the steps, the tool will download the necessary files to create a bootable media, which you can then use to start a computer to install Windows 11. Although you can install Windows 11 in multiple ways, if you plan to start from scratch, you would usually use a bootable USB flash drive to proceed with the setup. However, since you cannot officially purchase physical installation media, you need to create one yourself. Confirm your decision to destroy all data on this drive, and wait until the files are copied to your USB drive. When it is over, you will see the word "Ready" appearing below which means the bootable flash drive is now ready to use.

You can start installation of Windows 11 as the main operating system. Alternatively, you can create it with the help of Media Creation Tool. To do it, in the Media Creation Tool page "Choose media", select "ISO file" instead of "USB flash drive". Specify the folder where to save it.

Wait for the files to be downloaded and the system image to be created. When this process is complete, the Windows 11 ISO file will be saved to the folder you have chosen. After the download, continue with the default settings if you connected a USB flash drive to create bootable media. You need to have the ISO file using which you want to create bootable media. Insert the USB media into your PC, run the Rufus app, and you will be able to make a bootable media using the application.
We have already discussed how you can use Rufus to create bootable media in the above article. So you can follow the steps given in this article to create a bootable media using Rufus. Rufus is a popular application that you can use for creating bootable media using the ISO.

It is a small and reliable program using which you can make bootable ISO file media. If you don't know how to download the latest version of Rufus on your PC and use it, this article will help you with that. This is a good option if you wish to create a macOS bootable USB using a windows system.
In this, all you need to do is download its DMG file and then import it to TransMac. After this just insert the bootable USB drive and TransMac shall transform the drive-in APFS file format. The process of flashing takes time given the DMG picture is encrypted and the difference in the file system.

The application however works for most of the things and one is able to create a macOS bootable media on windows PC. In this simply you need to provide the source of the system picture and choose the device to flash on. If you wish to create bootable flash drives for smaller projects then this is a good option.


No comments:
Post a Comment
Note: Only a member of this blog may post a comment.